So I figured I needed to change them.
There's only about a week until Thanksgiving and then I'll need Christmas stuff. Making new pot holders and towels for just one holiday seemed like a lot of work, so I decided I should come up with something that would carry me through Christmas. I ran a list of applique ideas like Pilgrims and Santas through my head until I landed on a Gingerbread Man (well - metaphorically landed!).
And, I took some photos as I went so I could do this quick pot holder tutorial.
I started with a cookie cutter to help draw out a simple g-man shape for the pot holders. The supplies for one pot holder (I made 2) are listed below this photo:
Clockwise from upper left
~ dark brown thread that would be darker than the gingerbread fabric
~ rust fabric scrap for gingerbread man
~ g-man traced on fusible web
~ 2-1/4" by width of fabric for binding
~ 7" square for backing
~ 7" square for background
~ rick rack
~ 7" square Insul-bright batting
~ 7" square regular batting
Iron the fusible webbing to the wrong side of rust fabric according to package directions. Cut gingerbread man out with sharp scissors (note: I always lift a small section of paper before I cut the shape out to make it easier to remove the paper).
Fold the background fabric on the diagonal and press to create a line to help center the applique (I put the applique on the diagonal because it makes it easier to add the binding and hanger). Iron to fuse the applique to the background.
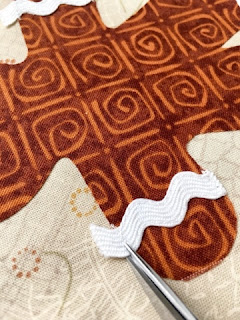
Add rick rack pieces. Cut them a little larger than needed. Stitch along edges.
Add rick rack pieces. Cut them a little larger than needed. Stitch along edges.
Trim after stitching.This will help prevent raveling.
Stitch around the outside of the gingerbread man with a small blanket stitch (or narrow zigzag).
Stack layers as follows: backing (wrong side up), battings, front of pot holder.
Line up all edges and pin.
Straight stitch around the outer edge of the gingerbread man with the same color of thread as the blanket stitch, through all 4 layers. Press and trim to 6-1/2" square.
Fold binding in half lengthwise and press. Place one end of binding at the corner above the head, lining up raw edges as shown in photo above. Begin stitching at the edge and stitch around the first three sides 1/4" from outside edge.
Stop at your regular pivot spot after 3 sides. Leave the needle down to hold everything in place. Go back to where you started and wrap the binding over the edge and pin (like you would if you were hand-sewing it down).
Continue sewing the binding down on the last side. Stitch right over the folded binding - be careful not to bunch up the binding on the underneath side and remove the pin when you get close to it.
It should look something like this when you're finished stitching.
Fold the binding to the wrong side and hand-stitch all the way around. Continue hand-stitching the binding closed for about 5"- 6" past the edge of the pot holder. You'll have a little binding "tail" at the top of your pot holder.Top-stitch all the way around the binding and to the end of the tail.
Loop the binding around and tack it to the back of the pot holder with a narrow zigzag stitch. And that's it - all finished!
I also made a couple of kitchen towels (well, I haven't quite finished the second one). Anyway, pictured below are both pot holders (front and back view) and the towel.
I'll be linking up with Oh Scrap! at quilting is more fun than housework and Linky Tuesday at freemotion by the river.


These are adorable! Thanks for sharing how you add your bindings and for linking up with Oh Scrap!
ReplyDeleteThanks Cynthia!! :)
Delete